
The following information is provided here as a free guide for inkle weavers.
I hope that you will find it helpful!
Thanks to members of the Inkle Weaving Group on Facebook for helping me put together this list of common questions. Special thanks to Janean Easley for her contributions.
If you would like to download and keep it, it's also available as an 8-page PDF here in my Etsy shop: https://www.etsy.com/listing/238666258/inkle-weaving-faqs-and-answers
The answers here address the traditional type of inkle loom which has pegs to hold the warp and uses string heddles. Other types of band looms with cloth beams are not discussed here. And, although rigid heddles and tablets can be used with an inkle loom, those also are not discussed here. The information herein comes from my own decades of experience in weaving with input from others as mentioned above. My answers may differ from those of other inkle weavers.
There is a glossary at the end of this page to clarify any terms you might not be familiar with.
What kind of loom should I get?
Buy one from a known manufacturer or, if buying from a small maker, be sure that it is tried and true and recommended by someone you trust. Not all inkle looms on the market are well-built.
Two-sided looms are great only if the second side is removable for ease of warping.
Unless space is a consideration or you plan to travel with your loom a lot, don't be tempted to buy a mini inkle loom. A full-sized one is generally easier to use and you can create a wider range of things on it.
Tension adjusters come mostly in two types. The peg which slides back and forth in a slot tends to be more durable than the paddle type. The latter doesn’t always hold under tension, and in some cases does not allow enough adjustment when using the full warp length on the loom.
In this post, I have shown some of my own looms and discussed what I like about them. Annie's looms.
The brand which I have used most and like the best is Schacht.
What should I make heddles out of?
Use something smooth and strong, never anything fuzzy or stretchy. Wool is not a good choice. Cotton is the easiest to work with. Linen and hemp can also work well and will be likely to last longer. I mostly use cotton and just replace them when they break. I use leftover short pieces saved from my warps and weft. Some inkle weavers swear by waxed linen, and some use dental floss, but I have never tried either.
How do I make heddles and how long should they be?
In this video by "Impending Looms" she does an excellent job of explaining how to check for the right length and then tie your heddles. https://www.youtube.com/watch?v=sJMobaaocT8
There are two methods of making heddles, a single loop or a doubled loop. I highly recommend the second method. To do this, make the heddle twice as long as needed. When warping you will put one end of the heddle loop on the heddle peg then fold it in half over your warp, slipping the other end of the loop onto the heddle peg. With a single loop you must pass your ball or skein of yarn through the heddle; it's awkward and, not workable if using a big ball or cone of yarn.
Putting heddles on one at a time during warping is, in my opinion, the easiest way, however, some weavers wait until the loom is warped entirely and then go back to put all of them on at once.
The length of heddles is important to get a good shed opening. The opening should be of equal size when you are creating both the up and down sheds. If your heddles are too long, your up shed opening will be small. If your heddles are too short, your down shed opening will be too small. When your heddles are the perfect length, you can look at your warp from the side and when your open warps are neither up nor down, but neutral, they will lay in the same plane alongside your heddled threads.
Your loom should come with instructions on how long to make heddles for it. Many looms provide two or more pegs at just the right distance apart for tying heddles. Be sure to tie them with a knot that will not loosen later. A common mistake is to use a Granny Knot rather than a Square Knot. You can learn the difference here: Square Knot & Granny Knot.
What yarn should I use for weaving on an inkle loom?
Warp: Most yarns that are not stretchy can be used as warp. If a yarn is too soft (i.e. single ply wools or some handspun yarns) it may not be strong enough to hold up under tension. You can test it first by attempting to break it by pulling it between your hands. If it breaks, you would be taking a risk by using it for weaving. With patience, you might be able to use some yarns which have lumps, slubs, boucle loops, eyelashes, or which are very fuzzy, but I don't recommend them.
The easiest fiber yarn to use is cotton. Silk, hemp, linen, wool, nylon, and other blends can also be used as long as they fit the above criteria. If using wool, be sure that it is not too elastic. Wool yarns intended for weaving are non-elastic as opposed to yarns for knitting or crochet which commonly have some stretch to them. The fuzzier the yarn the more likely it is to stick to the other warps and the heddles during weaving and this can make weaving miserable.
Some common and readily available yarns for the inkle include: crochet cottons, pearle cottons, and cotton rug warp. You can find some recommendations here.
Weft: Your weft can be the same yarn that you used for your warp or a different one. If you want a band that is flatter overall with skinnier rows, use a finer yarn for weft. If you want a thicker, denser band with wider rows, use a heavier yarn for weft.
If your weft is the same color as the border threads in your warp, it will not show along the selvages where it turns to go into the next row. If you use a different color weft, it will show up as little dots along the selvages and add a bit of a different element to your band's overall design.
How can I figure out how many warps to use?
I've written a blog post about how to estimate that and you can see it here. Why size matters.
"Inkle Weaving" by Helene Bress has a chart listing some specific yarns with estimated warps per inch for each. If the band's width is important, you should make a sample first.
If you are not sure and are anxious to get started weaving, give yourself some room for error by adding a couple of extra warps in there. If the band is working out to be too wide, it is easier to cut a couple of warps out than it is to add them in.
The warp length can be varied by winding around various combinations of different pegs on the loom. If you use all of the pegs, winding back and forth between them, you will get the maximum length. Use fewer pegs for a shorter warp.
The following things should be considered when calculating how long to make your warp:
As a general rule, you might want to allow 8-15 inches for loom waste (the part of the warp you are not able to weave at the ends.)
Some allowance should also be added for take up (your warp will get tighter as you weave along. The thicker your warp and weft yarns, the more take up you will have).
If you plan to wash it, add an allowance for shrinkage.
You may also want to add a few inches to save as a sample of the band for future reference.
These last two include so many variables, that I don't feel comfortable making any specific recommendations. If the finished length is important to you, make some preliminary tests to determine what these variables will be.
Desired finished length of the item (including fringes or allowance for sewing onto hardware) + loom waste + take up + shrinkage + sample = Warp Length
How do I warp the loom?
Watch the video here on this page.
The inkle loom allows you to prepare your warp directly on the loom in a continuous loop fashion, so no cutting or measuring of warp ahead of time is necessary. String heddles used on the loom separate the warp into two layers. Warps are put on the loom in two alternate paths with one going through a heddle, then up over the top bar and the next one being "open" or not heddled and it will pass under the top bar.
Before you start, make sure that the tension adjustment on your loom is set to give the maximum adjustment available to you as you weave. (If the loom has a peg in a slot at the front, it should be positioned at the end of the slot nearest the front of the loom.) Leaving a tiny bit of adjustment will allow you to pull this peg towards you to snug up the warp before starting to weave if necessary. As you weave you will be moving the tensioner away from you. Your warp is a continuous loop which will get smaller as you weave, so constant adjustments will be necessary to keep it from getting too tight.
Using my method, each warp color only has one knot in it. I tie the beginning end of each color in a half bow knot (or any quick release knot) to the front peg and only when I'm done with that color do I cut it. I then untie the knot from the peg and tie the finishing end to the beginning end making sure not to encircle the warp around that front peg. When a new color is introduced, the ball or skein of the first color can be pushed aside (you may want to put a weight on it to hold it) until needed again. When you go back to it, give it a tug to take out any slack and to be sure that you keep your tension consistent. In using this method, the colors will cross over one another at the ends, but this should not cause a problem as there is always some warp which will remain unwoven at the end of the piece (loom waste) and crossovers in this section of the warp will be of no consequence.
What is the right tension for my warp?
This answer is a bit subjective and up to the preference of the weaver, however, these are general guidelines:
The warp should be under moderate tension so that you are able to strum it and have it hold firm.
If too loose, your band may move around the loom as you beat, be a bit sloppy, or have ridges. If too tight, it may be difficult to beat, or your rows may appear elongated. Always loosen the tension on the warp before advancing it around the loom and then snug it up when you are done.
How do I position the loom for weaving?
Most inkle looms are made for weaving on your lap or a tabletop. (There are some with longer upright posts which stand tall on the floor, but they are an exception.)
It can be used in a reclining chair with the loom laid out on your lap and legs; you can hold the loom in place using your legs and feet. Or, sitting in a regular chair, prop the end of the loom up on a stool or something slightly higher than your lap. (If the prop is lower, then you have to bend over too much.) You can use your thighs and knees to help steady the loom.
If you prefer to use your loom on a tabletop, you will need to clamp it to the table to keep it in one spot. A non-skid shelf or rug liner can be used underneath it to help hold the loom in place and protect the surface.
Once the warp is on, how do I start my weaving?
Before you start weaving, look at a side view of your loom and check for warping errors. Be sure that all of the warps are following in the same two paths (heddled and open). It is easy to accidentally miss a peg somewhere and you will be able to see it if you look at the warp from the side.
It is advisable to have something handy to insert in your warp at the very beginning before starting to weave to help get that first row in straight. Here are two common methods.
A firm card will give you something to beat up against and can be removed as soon as you get a row or two in place. (The method I use.)
Or you can insert any of the following in your first several rows to help you establish the width of the band and get it going in a straight line: fabric strips, waste yarn, skinny strips of paper or cardboard, popsicle sticks, or wooden skewers.
After weaving a few rows, check to see that all of your warp threads are packed together and no weft is showing. Is it the band measuring the width you wanted? If not, you may be able to pull the weft a little more to narrow it up, or a little less to allow it to widen. Once you get started and establish that width, be consistent.
How tight should I pull the weft?
It is important to be consistent in pulling your weft to keep the band's width the same along its entire length. Normally, in warp-faced weaving, the weft should not be allowed to show through. Right from the beginning, you will want to be sure that you are pulling the weft enough to snug the warp threads up against each other with no weft showing. If you pull too tight, the warps will start to bunch up and squish on top of each other. If you pull just right, you will have a nice flat surface to your band.
How hard should I beat?
Working your shuttle, you can tap or rock against each row to pack it into place. The harder you beat, the more firmly the band becomes as you are making it tighter with more passes of the weft per inch. If you want a firm band, pack it tightly. If you want a softer band or one with more drape, pack loosely.
How do I keep my borders even?
Keeping the borders even is often a big challenge in the beginning until you have developed a feel for it. Even after years of weaving, it will still require attention. Consistency in pulling the weft through with the same amount of force is the first part. Keeping tension on the weft near your edge as you pull it through is also important to prevent little bumps or loops along the selvage.
Ruth MacGregor describes the technique quite well in this video: Selvedge Control in Narrow Weavings. You may want to keep a ruler handy and measure at regular intervals. Or use a "band width guide" as demonstrated in this video by Susan Foulkes. Five Ways of Weaving Narrow Bands.
Here is another way of working which is helpful to many. Weaving on the Edge by Jane Patrick.
What if I break a warp?
If you break a warp while weaving, it is possible to add a new one in. Tie the new one in place of the broken one at the far end of your warp where your knots are. Remove the broken one. Pull the new one through, being careful to follow the same path, and thread it through a heddle if needed. Fasten the loose end of the new warp by winding it in a figure 8 around a pin attached to the woven band a few inches forward of the working edge or fell. After you have woven a few shots and incorporated the new warp into your band, you can remove the pin. Later you can go back, thread the end on a needle and weave it into the band.
The following link is to a helpful video that will give you an idea of how to pin the new warp in. This video is meant for a floor loom, so the far end of the new warp is treated differently than on an inkle. On the inkle loom simply cut the new warp thread long enough to reach from the break to the far end of the warp and tie it to another warp end. Fixing a Broken Warp Video.
What if I run out of weft? Can I add more?
Yes! You can wind more weft onto your shuttle and begin weaving with it by overlapping the old and the new weft within a row. Tails of weft left sticking out can be trimmed off after you have removed the piece from the loom.
Is it necessary to loosen the tension on your warp before walking away from your loom and letting it sit for a long period?
While this is common practice with floor looms, it is not necessary with inkle looms. Inkle looms do not hold as much tension as do floor looms in general, but it may be a good practice anyway.
Should I wash the finished band?
Some weavers like to wash bands to give them a more finished appearance and feel, but this is not always a necessity.
If you are creating a piece that, because of its intended use, will need to be washed later (i.e. clothing trim, baby binky holder, dog collar) you should absolutely machine wash and dry your band before creating the finished object. Fasten it inside an old stocking or lingerie bag before running it through your machines. It will probably then need to be pressed flat after washing.
If you suspect that the yarns in your band are not colorfast, you should wash (or at least rinse) the band before sending it out to be used. I use a product called Shout Color-Catcher to keep the colors from bleeding all over each other when washing or rinsing.
The answers here address the traditional type of inkle loom which has pegs to hold the warp and uses string heddles. Other types of band looms with cloth beams are not discussed here. And, although rigid heddles and tablets can be used with an inkle loom, those also are not discussed here. The information herein comes from my own decades of experience in weaving with input from others as mentioned above. My answers may differ from those of other inkle weavers.
There is a glossary at the end of this page to clarify any terms you might not be familiar with.
What kind of loom should I get?
Buy one from a known manufacturer or, if buying from a small maker, be sure that it is tried and true and recommended by someone you trust. Not all inkle looms on the market are well-built.
Two-sided looms are great only if the second side is removable for ease of warping.
Unless space is a consideration or you plan to travel with your loom a lot, don't be tempted to buy a mini inkle loom. A full-sized one is generally easier to use and you can create a wider range of things on it.
Tension adjusters come mostly in two types. The peg which slides back and forth in a slot tends to be more durable than the paddle type. The latter doesn’t always hold under tension, and in some cases does not allow enough adjustment when using the full warp length on the loom.
In this post, I have shown some of my own looms and discussed what I like about them. Annie's looms.
The brand which I have used most and like the best is Schacht.
What should I make heddles out of?
Use something smooth and strong, never anything fuzzy or stretchy. Wool is not a good choice. Cotton is the easiest to work with. Linen and hemp can also work well and will be likely to last longer. I mostly use cotton and just replace them when they break. I use leftover short pieces saved from my warps and weft. Some inkle weavers swear by waxed linen, and some use dental floss, but I have never tried either.
How do I make heddles and how long should they be?
In this video by "Impending Looms" she does an excellent job of explaining how to check for the right length and then tie your heddles. https://www.youtube.com/watch?v=sJMobaaocT8
There are two methods of making heddles, a single loop or a doubled loop. I highly recommend the second method. To do this, make the heddle twice as long as needed. When warping you will put one end of the heddle loop on the heddle peg then fold it in half over your warp, slipping the other end of the loop onto the heddle peg. With a single loop you must pass your ball or skein of yarn through the heddle; it's awkward and, not workable if using a big ball or cone of yarn.
Putting heddles on one at a time during warping is, in my opinion, the easiest way, however, some weavers wait until the loom is warped entirely and then go back to put all of them on at once.
The length of heddles is important to get a good shed opening. The opening should be of equal size when you are creating both the up and down sheds. If your heddles are too long, your up shed opening will be small. If your heddles are too short, your down shed opening will be too small. When your heddles are the perfect length, you can look at your warp from the side and when your open warps are neither up nor down, but neutral, they will lay in the same plane alongside your heddled threads.
Your loom should come with instructions on how long to make heddles for it. Many looms provide two or more pegs at just the right distance apart for tying heddles. Be sure to tie them with a knot that will not loosen later. A common mistake is to use a Granny Knot rather than a Square Knot. You can learn the difference here: Square Knot & Granny Knot.
What yarn should I use for weaving on an inkle loom?
Warp: Most yarns that are not stretchy can be used as warp. If a yarn is too soft (i.e. single ply wools or some handspun yarns) it may not be strong enough to hold up under tension. You can test it first by attempting to break it by pulling it between your hands. If it breaks, you would be taking a risk by using it for weaving. With patience, you might be able to use some yarns which have lumps, slubs, boucle loops, eyelashes, or which are very fuzzy, but I don't recommend them.
The easiest fiber yarn to use is cotton. Silk, hemp, linen, wool, nylon, and other blends can also be used as long as they fit the above criteria. If using wool, be sure that it is not too elastic. Wool yarns intended for weaving are non-elastic as opposed to yarns for knitting or crochet which commonly have some stretch to them. The fuzzier the yarn the more likely it is to stick to the other warps and the heddles during weaving and this can make weaving miserable.
Some common and readily available yarns for the inkle include: crochet cottons, pearle cottons, and cotton rug warp. You can find some recommendations here.
Weft: Your weft can be the same yarn that you used for your warp or a different one. If you want a band that is flatter overall with skinnier rows, use a finer yarn for weft. If you want a thicker, denser band with wider rows, use a heavier yarn for weft.
If your weft is the same color as the border threads in your warp, it will not show along the selvages where it turns to go into the next row. If you use a different color weft, it will show up as little dots along the selvages and add a bit of a different element to your band's overall design.
How can I figure out how many warps to use?
I've written a blog post about how to estimate that and you can see it here. Why size matters.
"Inkle Weaving" by Helene Bress has a chart listing some specific yarns with estimated warps per inch for each. If the band's width is important, you should make a sample first.
If you are not sure and are anxious to get started weaving, give yourself some room for error by adding a couple of extra warps in there. If the band is working out to be too wide, it is easier to cut a couple of warps out than it is to add them in.
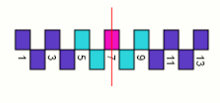
How do I read a pattern?
Below is a sample of a plain weave warping draft shown in 2 different forms.
The warping draft tells you in what order to arrange your warp threads on the loom to get the desired pattern. Each colored cell represents one warp thread. There are two rows. The top row represents warps that are heddled. The bottom row represents warps that are not heddled (open).
Start with #1 by threading it onto the loom through a heddle and up over the top bar.
Then, thread #2 without a heddle, under the top bar in the "open" position.
Continue warping the rest of the threads in numerical order, always following the same order and alternating between one heddled and one open.
Both of the below charts were created using the Band Weaving Pattern Editor.
I like to use the first version as I think it more closely represents the look of the woven band.
The cells look more like the threads as they appear in a woven band.

Most weaving books and many other sources will show a pattern draft in a form like the one below.
Here, the colored squares indicate the warp threads with white blocks in between them. The white blocks are just space holders and don't represent warp threads.

How do I design a pattern?
After choosing colors, you will want to play around with potential designs, right?
You can do this with paper and colored pencils or markers by using this handy grid paper. Print out a sheet and experiment with designs. Grid Paper.
Or, this online device is really awesome. You can choose colors and plug them into the grid to get a preview of your design. Band Weaving Pattern Editor.
If you need help getting started, you can use some of these designs which I've charted for you here on my blog. Pattern Drafts.
For a great, simple formula to choose colors that go together, read this post from the Fresh Stitches blog.
How long should I make my warp?After choosing colors, you will want to play around with potential designs, right?
You can do this with paper and colored pencils or markers by using this handy grid paper. Print out a sheet and experiment with designs. Grid Paper.
Or, this online device is really awesome. You can choose colors and plug them into the grid to get a preview of your design. Band Weaving Pattern Editor.
If you need help getting started, you can use some of these designs which I've charted for you here on my blog. Pattern Drafts.
For a great, simple formula to choose colors that go together, read this post from the Fresh Stitches blog.
The warp length can be varied by winding around various combinations of different pegs on the loom. If you use all of the pegs, winding back and forth between them, you will get the maximum length. Use fewer pegs for a shorter warp.
The following things should be considered when calculating how long to make your warp:
As a general rule, you might want to allow 8-15 inches for loom waste (the part of the warp you are not able to weave at the ends.)
Some allowance should also be added for take up (your warp will get tighter as you weave along. The thicker your warp and weft yarns, the more take up you will have).
If you plan to wash it, add an allowance for shrinkage.
You may also want to add a few inches to save as a sample of the band for future reference.
These last two include so many variables, that I don't feel comfortable making any specific recommendations. If the finished length is important to you, make some preliminary tests to determine what these variables will be.
Desired finished length of the item (including fringes or allowance for sewing onto hardware) + loom waste + take up + shrinkage + sample = Warp Length
How do I warp the loom?
Watch the video here on this page.
The inkle loom allows you to prepare your warp directly on the loom in a continuous loop fashion, so no cutting or measuring of warp ahead of time is necessary. String heddles used on the loom separate the warp into two layers. Warps are put on the loom in two alternate paths with one going through a heddle, then up over the top bar and the next one being "open" or not heddled and it will pass under the top bar.
Before you start, make sure that the tension adjustment on your loom is set to give the maximum adjustment available to you as you weave. (If the loom has a peg in a slot at the front, it should be positioned at the end of the slot nearest the front of the loom.) Leaving a tiny bit of adjustment will allow you to pull this peg towards you to snug up the warp before starting to weave if necessary. As you weave you will be moving the tensioner away from you. Your warp is a continuous loop which will get smaller as you weave, so constant adjustments will be necessary to keep it from getting too tight.
Using my method, each warp color only has one knot in it. I tie the beginning end of each color in a half bow knot (or any quick release knot) to the front peg and only when I'm done with that color do I cut it. I then untie the knot from the peg and tie the finishing end to the beginning end making sure not to encircle the warp around that front peg. When a new color is introduced, the ball or skein of the first color can be pushed aside (you may want to put a weight on it to hold it) until needed again. When you go back to it, give it a tug to take out any slack and to be sure that you keep your tension consistent. In using this method, the colors will cross over one another at the ends, but this should not cause a problem as there is always some warp which will remain unwoven at the end of the piece (loom waste) and crossovers in this section of the warp will be of no consequence.
What is the right tension for my warp?
This answer is a bit subjective and up to the preference of the weaver, however, these are general guidelines:
The warp should be under moderate tension so that you are able to strum it and have it hold firm.
If too loose, your band may move around the loom as you beat, be a bit sloppy, or have ridges. If too tight, it may be difficult to beat, or your rows may appear elongated. Always loosen the tension on the warp before advancing it around the loom and then snug it up when you are done.
How do I position the loom for weaving?
Most inkle looms are made for weaving on your lap or a tabletop. (There are some with longer upright posts which stand tall on the floor, but they are an exception.)
It can be used in a reclining chair with the loom laid out on your lap and legs; you can hold the loom in place using your legs and feet. Or, sitting in a regular chair, prop the end of the loom up on a stool or something slightly higher than your lap. (If the prop is lower, then you have to bend over too much.) You can use your thighs and knees to help steady the loom.
If you prefer to use your loom on a tabletop, you will need to clamp it to the table to keep it in one spot. A non-skid shelf or rug liner can be used underneath it to help hold the loom in place and protect the surface.
Before you start weaving, look at a side view of your loom and check for warping errors. Be sure that all of the warps are following in the same two paths (heddled and open). It is easy to accidentally miss a peg somewhere and you will be able to see it if you look at the warp from the side.
It is advisable to have something handy to insert in your warp at the very beginning before starting to weave to help get that first row in straight. Here are two common methods.
A firm card will give you something to beat up against and can be removed as soon as you get a row or two in place. (The method I use.)
Or you can insert any of the following in your first several rows to help you establish the width of the band and get it going in a straight line: fabric strips, waste yarn, skinny strips of paper or cardboard, popsicle sticks, or wooden skewers.
After weaving a few rows, check to see that all of your warp threads are packed together and no weft is showing. Is it the band measuring the width you wanted? If not, you may be able to pull the weft a little more to narrow it up, or a little less to allow it to widen. Once you get started and establish that width, be consistent.
How tight should I pull the weft?
It is important to be consistent in pulling your weft to keep the band's width the same along its entire length. Normally, in warp-faced weaving, the weft should not be allowed to show through. Right from the beginning, you will want to be sure that you are pulling the weft enough to snug the warp threads up against each other with no weft showing. If you pull too tight, the warps will start to bunch up and squish on top of each other. If you pull just right, you will have a nice flat surface to your band.
How hard should I beat?
Working your shuttle, you can tap or rock against each row to pack it into place. The harder you beat, the more firmly the band becomes as you are making it tighter with more passes of the weft per inch. If you want a firm band, pack it tightly. If you want a softer band or one with more drape, pack loosely.
How do I keep my borders even?
Keeping the borders even is often a big challenge in the beginning until you have developed a feel for it. Even after years of weaving, it will still require attention. Consistency in pulling the weft through with the same amount of force is the first part. Keeping tension on the weft near your edge as you pull it through is also important to prevent little bumps or loops along the selvage.
Ruth MacGregor describes the technique quite well in this video: Selvedge Control in Narrow Weavings. You may want to keep a ruler handy and measure at regular intervals. Or use a "band width guide" as demonstrated in this video by Susan Foulkes. Five Ways of Weaving Narrow Bands.
Here is another way of working which is helpful to many. Weaving on the Edge by Jane Patrick.
What if I break a warp?
If you break a warp while weaving, it is possible to add a new one in. Tie the new one in place of the broken one at the far end of your warp where your knots are. Remove the broken one. Pull the new one through, being careful to follow the same path, and thread it through a heddle if needed. Fasten the loose end of the new warp by winding it in a figure 8 around a pin attached to the woven band a few inches forward of the working edge or fell. After you have woven a few shots and incorporated the new warp into your band, you can remove the pin. Later you can go back, thread the end on a needle and weave it into the band.
The following link is to a helpful video that will give you an idea of how to pin the new warp in. This video is meant for a floor loom, so the far end of the new warp is treated differently than on an inkle. On the inkle loom simply cut the new warp thread long enough to reach from the break to the far end of the warp and tie it to another warp end. Fixing a Broken Warp Video.
What if I run out of weft? Can I add more?
Yes! You can wind more weft onto your shuttle and begin weaving with it by overlapping the old and the new weft within a row. Tails of weft left sticking out can be trimmed off after you have removed the piece from the loom.
Is it necessary to loosen the tension on your warp before walking away from your loom and letting it sit for a long period?
While this is common practice with floor looms, it is not necessary with inkle looms. Inkle looms do not hold as much tension as do floor looms in general, but it may be a good practice anyway.
Should I wash the finished band?
Some weavers like to wash bands to give them a more finished appearance and feel, but this is not always a necessity.
If you are creating a piece that, because of its intended use, will need to be washed later (i.e. clothing trim, baby binky holder, dog collar) you should absolutely machine wash and dry your band before creating the finished object. Fasten it inside an old stocking or lingerie bag before running it through your machines. It will probably then need to be pressed flat after washing.
If you suspect that the yarns in your band are not colorfast, you should wash (or at least rinse) the band before sending it out to be used. I use a product called Shout Color-Catcher to keep the colors from bleeding all over each other when washing or rinsing.
More about this here: https://aspinnerweaver.blogspot.com/2017/03/should-you-wet-finish-your-woven-band.html
How do I finish the ends?
After you have cut your piece off the loom, you can thread the loose end of the weft onto a blunt-tipped needle (also called a tapestry needle) and weave it back through the last row or two of your woven band. This will prevent the band from unraveling and no further action (like machine sewing or hemstitching) is necessary.
In some cases, you will be sewing the end of the band to a buckle or some other hardware that will secure it further. In this case, you can cut the band to any length you need. A lot of people ask "Won't it unravel if I cut it?" My answer is this: Think about when you cut the legs off a pair of jeans. They don't start unraveling until you handle them and wash them. So, if you cut your band and add your hardware right away, you should have no problem.
If not attaching it to something, you can sew a bit of fabric or leather to cover the raw, cut edges of your band, making a smooth end, or you can make fringes on the ends. Fringes can be gathered into groups and braided or twisted. Or you can simply gather them into groups and tie an overhand knot at the fell line. Multiple knots or macrame techniques could also be used.
This book has a myriad of ideas! A Compendium of Finishing Techniques.
Where can I find patterns and how do I read them?
http://aspinnerweaver.blogspot.com/p/pattern-drafts.html
What can I make from an inkle band?
I've collected a list which you can find here on my blog. Uses for a woven band.
Also, Jennifer Williams has brilliant and unusual ideas for using inkle bands and has published some of them as tutorials here on her blog. Inkled Pink.
Where do I find the hardware to finish my item?
Sewing Supplies on Etsy, Strapworks.com, and BuckleGuy.com
What is pickup?
In plain weave, your pattern is determined by how you arrange your colors in
the warp. The raising and lowering of the sheds creates a pattern that
alternates in two rows. Color and pattern combinations are endless. Examples
can be seen in this photo album. Plain Weave Album.https://www.flickr.com/photos/aspinnerweaver/sets/72157626855413579
Are there other ways of creating patterns on a band besides plain weave and pickup?
Pickup patterns use the warp threads for making more intricate designs, but you can also use the weft to make brocade patterns. Check out Laverne Waddinton's blog for a tutorial here. Supplementary Weft Patterning.
You can paint your warp before putting it on the loom. Melissa Wold McCollum has a nice tutorial on her blog for doing this. Warp Painting.
For adding beads along the borders, check out this article by Ruth MacGregor. Beading on the Edge.
What are some good resources for learning about inkle weaving?
We are lucky to be weaving in a time of much information! Visit this page on my blog where I have collected some of my favorites. Resources. There are many more out there and I'm sure I've missed some good ones.
Are there any inkle weaving groups, guilds, or societies?
Oh, yeah! Below are a few that I belong to. These are all set up so that you have to join them to post and read others' posts.
Inkle Loom Weavers on Ravelry
Inkle Weaving Group on Facebook
Dutch Inkle Weavers on Facebook
The Braid Society
Braids and Bands Group on Yahoo
Inkle weaving terminology:
Inkle - A linen band or drawstring (an old English word, also spelled inckle, incle, ynkle, ynckle, ynkell, ynchull)
Warp- The threads you put on your loom when setting it up to weave. They run in a continuous loop around the loom.
Weft- The thread (normally wound around a shuttle) that you pass back and forth during weaving.
Warp-faced- A woven fabric or band in which only the warp (not the weft) shows as part of the design. Inkle looms are made to create warp-faced bands.
Heddle- (Also may be called leash). Inkle looms typically use string loops as heddles. These serve to separate the warp threads into two layers by anchoring the upper set, allowing you to move only the lower set to create a shed opening to pass your weft through.
Heddled threads- Those warps which pass through the heddles (alternates with open threads)
Open threads- Those warps which do not pass through heddles (alternates with heddled threads)
Shed- The opening between the two layers of warp threads where you pass the weft through.
Up-Shed- The shed opening created by lifting the open threads upward.
Down-Shed- The shed opening created by pushing the open threads downward.
Selvages- Right and left edges of the band.
Fell or fell line - The exact point where warp turns into woven fabric, the edge of the last row woven, and the place where you will pass your next weft.
Take up - The percentage of the overall warp length which, during the weaving process, contracts. Because of take-up, the length of the warp after weaving is shorter than before weaving. The heavier the threads used, the greater the take-up.
Loom waste - You will not be able to weave the entire length of your warp. This is the amount of warp left unwoven at the end of your band. It can be used for making into fringes, or cut off and discarded, or saved for other uses. (I use some of these to make new heddles.)
Plain weave- The result of the natural process of weaving in which the threads are alternately lifted and lowered. Designs are created according to the order of the warp threads on the loom. The woven surface of the band will be flat.
Pickup- A patterning technique that requires picking or dropping individual threads (or possibly a few threads together) out of their normal sequence. The pattern formed by this action will be more complex than plain weave. The resulting band will have some threads which appear raised.
For some attractive plain weave pattern drafts, look here: http://aspinnerweaver.blogspot.com/2014/02/in-celebration-of-plain-weave.html
and here: http://aspinnerweaver.blogspot.com/2015/01/a-dozen-plain-weave-pattern-drafts.html.
A pickup pattern is, as it suggests, a method that requires you to pick (or sometimes pick and drop) some warp threads out of their normal sequence. They then float over the surface of the woven band, creating a more complex design. There are several types of pickup. For some discussion, examples and pickup patterns have a look here on my blog. Pickup patterns: http://aspinnerweaver.blogspot.com/2015/10/inkle-pickup-on-speckled-background.html
Are there other ways of creating patterns on a band besides plain weave and pickup?
Pickup patterns use the warp threads for making more intricate designs, but you can also use the weft to make brocade patterns. Check out Laverne Waddinton's blog for a tutorial here. Supplementary Weft Patterning.
You can paint your warp before putting it on the loom. Melissa Wold McCollum has a nice tutorial on her blog for doing this. Warp Painting.
For adding beads along the borders, check out this article by Ruth MacGregor. Beading on the Edge.
We are lucky to be weaving in a time of much information! Visit this page on my blog where I have collected some of my favorites. Resources. There are many more out there and I'm sure I've missed some good ones.
Are there any inkle weaving groups, guilds, or societies?
Oh, yeah! Below are a few that I belong to. These are all set up so that you have to join them to post and read others' posts.
Inkle Loom Weavers on Ravelry
Inkle Weaving Group on Facebook
Dutch Inkle Weavers on Facebook
The Braid Society
Braids and Bands Group on Yahoo
Inkle weaving terminology:
Inkle - A linen band or drawstring (an old English word, also spelled inckle, incle, ynkle, ynckle, ynkell, ynchull)
Warp- The threads you put on your loom when setting it up to weave. They run in a continuous loop around the loom.
Weft- The thread (normally wound around a shuttle) that you pass back and forth during weaving.
Warp-faced- A woven fabric or band in which only the warp (not the weft) shows as part of the design. Inkle looms are made to create warp-faced bands.
Heddle- (Also may be called leash). Inkle looms typically use string loops as heddles. These serve to separate the warp threads into two layers by anchoring the upper set, allowing you to move only the lower set to create a shed opening to pass your weft through.
Heddled threads- Those warps which pass through the heddles (alternates with open threads)
Open threads- Those warps which do not pass through heddles (alternates with heddled threads)
Shed- The opening between the two layers of warp threads where you pass the weft through.
Up-Shed- The shed opening created by lifting the open threads upward.
Down-Shed- The shed opening created by pushing the open threads downward.
Pick or row- A line of weaving created by one pass of the weft.
Beat- To tap, press, or rock your shuttle up against the last row helping to pack it in and form a straight row. This is done when you insert the shuttle into the shed, before passing the weft through to the other side.
Bars, pegs or rods (these are all common terms for the same thing) They are commonly dowel rods that protrude from the frame and are what the warp threads are wound around.
Tensioner or tension bar - That part of the loom which moves to allow you to adjust the warp tension. It may be one of the pegs which moves back and forth in a slot, or it may be a paddle or block which pivots on a metal bolt.
Heddle bar - The one bar to which the string heddles are affixed.
Starting bar - The one in the front of the loom where you begin warping.
Top bar - The one (usually positioned just above the heddle bar) which all heddled threads pass over after they go through the heddles. Open or unheddled threads pass underneath this bar.
Back bar - The one where all warps meet and continue into the same path after either alternately going through a heddle and over the top bar, or going unheddled and under the heddle bar.
If you have a loom with a paddle adjustment as the Ashford looms do, it is here in place of the bar.
Shuttle- (Also sometimes called a stick shuttle or belt shuttle.) Tool used to hold the weft thread and pass it from one side to the other during weaving. Usually made of a flat piece of wood with notches in both ends. Also used to beat.Beat- To tap, press, or rock your shuttle up against the last row helping to pack it in and form a straight row. This is done when you insert the shuttle into the shed, before passing the weft through to the other side.
Bars, pegs or rods (these are all common terms for the same thing) They are commonly dowel rods that protrude from the frame and are what the warp threads are wound around.
Tensioner or tension bar - That part of the loom which moves to allow you to adjust the warp tension. It may be one of the pegs which moves back and forth in a slot, or it may be a paddle or block which pivots on a metal bolt.
Heddle bar - The one bar to which the string heddles are affixed.
Starting bar - The one in the front of the loom where you begin warping.
Top bar - The one (usually positioned just above the heddle bar) which all heddled threads pass over after they go through the heddles. Open or unheddled threads pass underneath this bar.
Back bar - The one where all warps meet and continue into the same path after either alternately going through a heddle and over the top bar, or going unheddled and under the heddle bar.
If you have a loom with a paddle adjustment as the Ashford looms do, it is here in place of the bar.
Selvages- Right and left edges of the band.
Fell or fell line - The exact point where warp turns into woven fabric, the edge of the last row woven, and the place where you will pass your next weft.
Take up - The percentage of the overall warp length which, during the weaving process, contracts. Because of take-up, the length of the warp after weaving is shorter than before weaving. The heavier the threads used, the greater the take-up.
Loom waste - You will not be able to weave the entire length of your warp. This is the amount of warp left unwoven at the end of your band. It can be used for making into fringes, or cut off and discarded, or saved for other uses. (I use some of these to make new heddles.)
Plain weave- The result of the natural process of weaving in which the threads are alternately lifted and lowered. Designs are created according to the order of the warp threads on the loom. The woven surface of the band will be flat.
Pickup- A patterning technique that requires picking or dropping individual threads (or possibly a few threads together) out of their normal sequence. The pattern formed by this action will be more complex than plain weave. The resulting band will have some threads which appear raised.
I need to weave a 10' band. Can this be done on an inkle loom?
ReplyDeleteHi, Sommar. That length is too long for a typical inkle loom, but there are some which could handle it. If you don't own a larger capacity inkle loom, you might consider using a backstrap loom as they are easy to assemble on your own.
DeleteDo you know the maximum length band that can be made on a Standard Inkle Loom (table model) by Ashford?
ReplyDeleteJudith, sorry I don't have one of those. The manufacturer's website says that the maximum warp length is 110". Allow some for take-up and some for loom waste. My estimate is that you could get a finished piece around 7 ft. or a bit longer depending on the yarn you use.
Deletecan you please explain to me how I warp me loom if I want to weave letters using 2 colors. im a beginner and I cant find any detailed information anywhere. thank you. my email address is metamed@vodamail.co.za
ReplyDeleteSending you an email.
DeleteI'm new at inkle weaving and found this to be a great help in getting started, actually weaving, and finishing the project. Thank you.
ReplyDeleteWonderful! I'm happy to be of service!
DeleteHi Annie ... love your blog (and videos)! Can you tell me where on your blog are the directions that support the letter pickup video? I'm not sure how you warped the side edges? TIA. You're the greatest! SueG
ReplyDeleteHi, Sue. Thanks! Here's the link to that page on the blog. You can always use the search bar in the right column to help you find things here in the future.
Deletehttp://aspinnerweaver.blogspot.com/2015/12/weaving-letters-on-inkle-band.html
Happy Weaving !
Annie
Thanks, kiddo. Your video and directions got me up and running!
DeleteCheers - SueG
Hi, again, Annie. One more question. Where would one go for directions on how to add more space between words than just the natural line that forms between letters? (My lettering is progressing nicely but I'm not sure how to create a bit more space between words.) Hope this questions makes sense.
ReplyDeleteIf easier for answering I can be reached at gmom@wildblue.net
TIA - SueG
Sue, glad to hear that the directions were helpful!
ReplyDeleteHow you create space between words is a personal choice. I like to weave 3 rows of the background color to make space. I have seen others effectively use dots, dashes or other figures. If you do that, you have to choose something which can't be mistaken for a letter. Leaving a single upright bar in between words looks confusing, like maybe it's supposed to be a letter. ~Annie
Thanks so much for clarification!
ReplyDeleteSueG
I am a newbie to inkle weaving & want to make a dog collar / eash. I would prefer something stronger like nylon. What size nylon thread should I use? Thank you
ReplyDeleteI have not made dog collars and leashes, myself, so I cannot answer from personal experience. I have some crochet nylon that seems like it would be a good one for this use. It's this one: http://creativeyarnsource.com/shop/about-nylon/5-omega-nylon2/
ReplyDeleteI am starting a belt and would like to be able to add decorations/ charms onto it. My initial though is to add small rings alond the center line of the belt at regular interval to be able to add whatever I fancy later on, tassels, Bell, beads...
ReplyDeleteIs it possible? Or is there a different way of doing it? Thank you.
Josephine, I have woven beads into a band, but never charms. You could weave in small rings either on the warp or weft. I think if I were you and not sure what you want to add, I'd take the easy way out and just sew on the embellishments later. ~Annie
DeleteHi Annie, I love all of the information on your site, thank you for sharing all this information. I have a quick question. I notice that many weaver leave a loop of weft change sheds, beat and then pull that little loop through. It doesn't look like you do that on the videos I've watched. Are there any pros or cons to either method or is it just personal preference? Thank you.
ReplyDeleteHow do you weave wool without it felting on itself as you go? I also have a hard time separating the shed to move along with the next weft. VERY frustrating.
ReplyDeleteWeaving with wool can really try your patience! If your yarn has a fuzzy texture, you just have to go slowly. Advancing the warp often and spreading the threads apart as far as possible can help. I've read that some weavers suggest spraying the warp with hair conditioner, but I have not done this.
DeleteHi Annie. I just want to thank you for taking the time to post ALL this information. It's extremely helpful!!
ReplyDeleteI'm a beginner and I'm also searching for information on pick-up weaving (Inkle). Thus far, I haven't found a complete tutorial on this topic. Will continue searching. Meanwhile, I'll continue to weave to my heart's content. Lol
Hi Annie,
ReplyDeleteI am just starting out on my new inkle loom. Can my long inkle band be cut into 2 shorter bands once off the loom?
Thanks for asking this question. I've edited the text and hope that this helps.
DeleteHi Annie! This website has been so helpful, I frequently visit it!
ReplyDeleteSame question as the above commenter- can a band be cut into multiple bands? Or will it unravel?
I’m trying to make short keychains but don’t want to waste all this nice yarn! Many thanks :)
That is a frequently asked question that I hadn't really answered. I've just edited the text above and hope that this covers it.
DeleteHi - My name is Dave and I am not a weaver but a woodworker in love with a spinner/weaver. Cathy is teaching a class in inkle loom weaving and I am making the looms.
ReplyDeleteI have one done and it's been a prototype. We have decided the tweaks that need to be made and I'm on it. My question is regarding operations. Cathy warped up the prototype and it was okay except that I have not yet added a finish to the loom and moving the warp is difficult. I was planning to finish the looms with tung oil. Not sure that will allow the warp to move better. I'm considering waxing the dowels after the tung oil is cured.
Is this a good approach? Maybe I should finish them with varathane and it might slide better. Any ideas? Thanks
Hi, Dave. Could you send me an email to discuss? My address is: iweavestraps@gmail.com. There could be many reasons for a warp that won't move.
DeleteHello Dave - I am having a lot of difficulty moving the warp along on my Ashford Inklette loom….in fact it would really put me off the whole thing! Even when I loosen the tension, the warp won’t really move forward without a lot of pulling, so that the piece already woven goes out of shape etc. It seems that the heddles are not allowing the warp threads to move through them. I used linen thread for the heddles. Just wondering if you found a solution to the problem and if so, what it is! Thanks.
DeleteThe looms are similar to an Ashford and the body is walnut with 3/4" birch dowels
ReplyDeleteYour blog (and especially this article) has been very helpful to me as I started to inkle weave this fall. There is only one thing that I wasn't able to learn from, and that is because the link to the "Beading on the Edge" article went to a page with this error message:
ReplyDeleteNot Found
The requested URL was not found on this server.
Additionally, a 404 Not Found error was encountered while trying to use an ErrorDocument to handle the request.
Do you have any other links about beading the edge of an inkle band?
Otherwise, you are practically a one-stop resource for us newbie inkle weavers!
Thank you!
Hi! I'm glad that you have found some useful information here. I tried the link and got the same error message. Then, I found the article and updated the link. I'm not sure what happened as it looks to be going to the same page as before. ???
DeleteAre there any tools anywhere to calculate take up for a given thread, say cotton 8/2, or 8/4? I haven't a clue whether it would be 20% or 80%. It seems to me that it should be possible to estimate a percentage, with given variables...
ReplyDeleteThanks!
PS I love your book, "In Celebration of Plain Weave". So well written, beautiful illustrations, and so much information. The color theory and design hints are so helpful.
Hi! Thanks for the nice comments about my book!
DeleteYou ask a good question, but I'm afraid that I don't have a good answer. Although I've seen someone write about takeup, I don't remember who or where. I don't keep notes for myself. I can tell you that you'll loose about 10-18" as loom waste, some for takeup and some for shrinkage if you choose to wash it. The thicker your yarn, especially the weft, the more the takeup will be. I'd put it closer to 20% as a guess. I'm sure that you will take better notes than I and soon have your own answer! Happy Weaving, Annie
I am having a great deal of keeping the tension on both my outer threads to the point that I must weight them. when I start out they are all very well tensioned, but start loosening up within about 12". What am I doing wrong?? Is this common?
ReplyDeleteHi, Marj.
DeleteI am sorry but I can't shine much light on this subject.
I don't think that it is common and I have not had this experience. Are you using a yarn which stretches? Why only the outer threads? Did you tie them off separately? I only tie one knot per color, so that the warps are not separate, but connected. If you tied yours separately, perhaps you can try re-tying them. If not, you could still cut and re-tie just the ones that are causing the problem.
Annie, I am warping my inkle loom and have a question regarding Pattern 136 in your book In Celebration of Plain Weave. When there is a color on line 1 and a different color on line 2 below, am I cutting the warp thread and tying on for each color change as I go along the pattern? I'm not a novice but haven't dealt with this intermittent color change one on top of the other in the pattern yet. Also what is the notation Short link KP mean...Patterns all have some note under the drawdown and if it was covered in the beginning text I must have missed it. Thanks for any help. Barbara C
ReplyDeleteHi, Barbara. If you watch the video above in this post, you should be able to see how to switch from one color to another. Using my method, you will only tie one knot per color.
DeleteThe answer to your second question can be found on page 55 of the book under the heading "Using the Charts".
Inkle loom improvements : yes, someone said o-rings to stop warp falling off - essential !! Also I use a polished aluminium rod as a warp separator/ beater - really good for fuzzy warp like acrylic, etc. Also, ace addition = white cardboard under warp, so you can really see the edges, & keep them straight & even. (Also stops weft from entanglement on tension knob !).
ReplyDeleteAll good tips!
DeleteHi Annie! I found this article while researching for a story I'm writing. The heroine raises sheep and has a business where she sells her fiber from washed locks to finished products like yarns, blankets, straps, and felted items. A bit much, perhaps, but a girl can dream, right? I do some spinning and felting, and my mom weaves a little. Anyway, I just wanted to thank you for all the detail you give here. It's very helpful, and I'm keeping the page open for easy reference when needed.
ReplyDeleteThanks!
~Jamie
Yay! Thanks for the note!
DeleteDo you have any resources for how to add beads to an inkle band (after the loom is already warped and the weaving has begun)?
ReplyDeleteYes. You can put the beads on the weft and leave them at the edges as often as you like.
DeleteYour content is always interesting and helpful.
ReplyDelete